Arborvitae deliver what most homeowners want from evergreens: year-round privacy, dense foliage, and minimal upkeep. These vertical growers can screen a property line, frame an entryway, or anchor a garden bed without sprawling into neighboring lawn. They tolerate cold winters and adapt to a range of soils, making them a reliable choice for backyard projects across much of North America. Whether the goal is blocking out neighbors, buffering street noise, or creating defined outdoor rooms, arborvitae offer a living solution that improves with time.
Table of Contents
ToggleKey Takeaways
- Arborvitae deliver year-round privacy and dense foliage with minimal upkeep, making them ideal for backyard landscaping projects across North America.
- Choose Emerald Green for narrow spaces (3–4 feet wide), Green Giant for large properties (12–15 feet wide), or North Pole as a middle-ground option depending on your available space and privacy goals.
- Plant arborvitae in early spring or early fall at the same depth as their nursery container, spacing them 3–6 feet apart depending on variety, and keep mulch 2–3 inches away from the trunk.
- Newly planted arborvitae require 1–2 waterings per week for the first season; established plants are drought-tolerant but thrive with consistent moisture and minimal pruning.
- Design with arborvitae by framing entryways, creating living fences, staggering double rows for enhanced privacy, or layering with shade-tolerant perennials to add seasonal color and textural contrast.
- Maintain at least 3–4 feet of clearance from fences, foundations, and walkways to ensure proper air circulation, and call 811 before digging to mark underground utilities safely.
Why Arborvitae Are Perfect for Backyard Landscaping
Arborvitae earn their place in residential landscapes through three practical advantages: dense evergreen foliage, predictable upright growth, and low maintenance needs.
The dense, scale-like foliage blocks sight lines and absorbs sound more effectively than deciduous hedges. Because arborvitae keep their needles year-round, privacy doesn’t vanish when temperatures drop.
Most varieties grow in a tight columnar or pyramidal form, meaning they don’t creep laterally into walkways or patios. A row spaced correctly will knit together into a solid screen without requiring aggressive pruning. This controlled habit suits narrow side yards and property lines where horizontal space is limited.
Unlike high-maintenance hedges that demand frequent shearing, arborvitae maintain their shape with minimal intervention. An annual light trim keeps them tidy, but many homeowners go years without touching them. They’re also deer-resistant when mature, though young transplants may need protection.
Arborvitae adapt to USDA hardiness zones 2 through 7 depending on the variety, tolerate partial shade, and aren’t fussy about soil pH as long as drainage is adequate. That versatility makes them suitable for most temperate climates and a wide range of yard conditions.
Choosing the Right Arborvitae Varieties for Your Yard
The right arborvitae depends on mature height, growth rate, and available space. Here are the most common varieties and their best uses:
Emerald Green (Thuja occidentalis ‘Smaragd’) reaches 12–15 feet tall and 3–4 feet wide at maturity. Its slow, compact growth suits foundation plantings and narrow side yards. Expect about 6–9 inches of vertical growth per year.
Green Giant (Thuja standishii × plicata) grows fast, 3–5 feet per year, and tops out around 30–40 feet tall and 12–15 feet wide. Use it for large-scale privacy screens or windbreaks on spacious properties. It’s not the choice for tight urban lots.
North Pole (Thuja occidentalis ‘Art Boe’) stays narrow, maturing at 10–15 feet tall and 3–5 feet wide. It’s a good middle ground between Emerald Green’s compact size and Green Giant’s speed.
American Pillar (Thuja occidentalis ‘American Pillar’) offers disease resistance and cold hardiness, growing 15–20 feet tall and 3–4 feet wide. It’s well-suited to colder climates and performs reliably in zone 3.
Before purchasing, measure the planting area and account for mature spread. A common mistake is spacing arborvitae too close to fences, foundations, or walkways. Leave at least 3–4 feet of clearance from structures to allow for air circulation and maintenance access.
Planning Your Arborvitae Landscape Design
Start by mapping the property on graph paper or using a landscape design app. Mark existing structures, utilities, and sun exposure patterns. Arborvitae tolerate partial shade but grow fullest in 6+ hours of direct sunlight.
For a formal privacy screen, plant arborvitae in a straight line along the property boundary. Space Emerald Greens 3–4 feet apart (on center) for a dense hedge that fills in within 3–5 years. Green Giants need 5–6 feet between plants due to their wider spread.
Avoid planting directly on the property line. Set the row at least 2–3 feet inside your boundary to prevent root and branch encroachment onto neighboring property. Check local ordinances, some municipalities regulate hedge height near streets or sidewalks.
Consider underground utilities before digging. Call 811 at least two business days before planting to mark buried lines. Arborvitae roots spread wide but stay relatively shallow, so they’re unlikely to damage sewer lines or foundations if planted with adequate clearance.
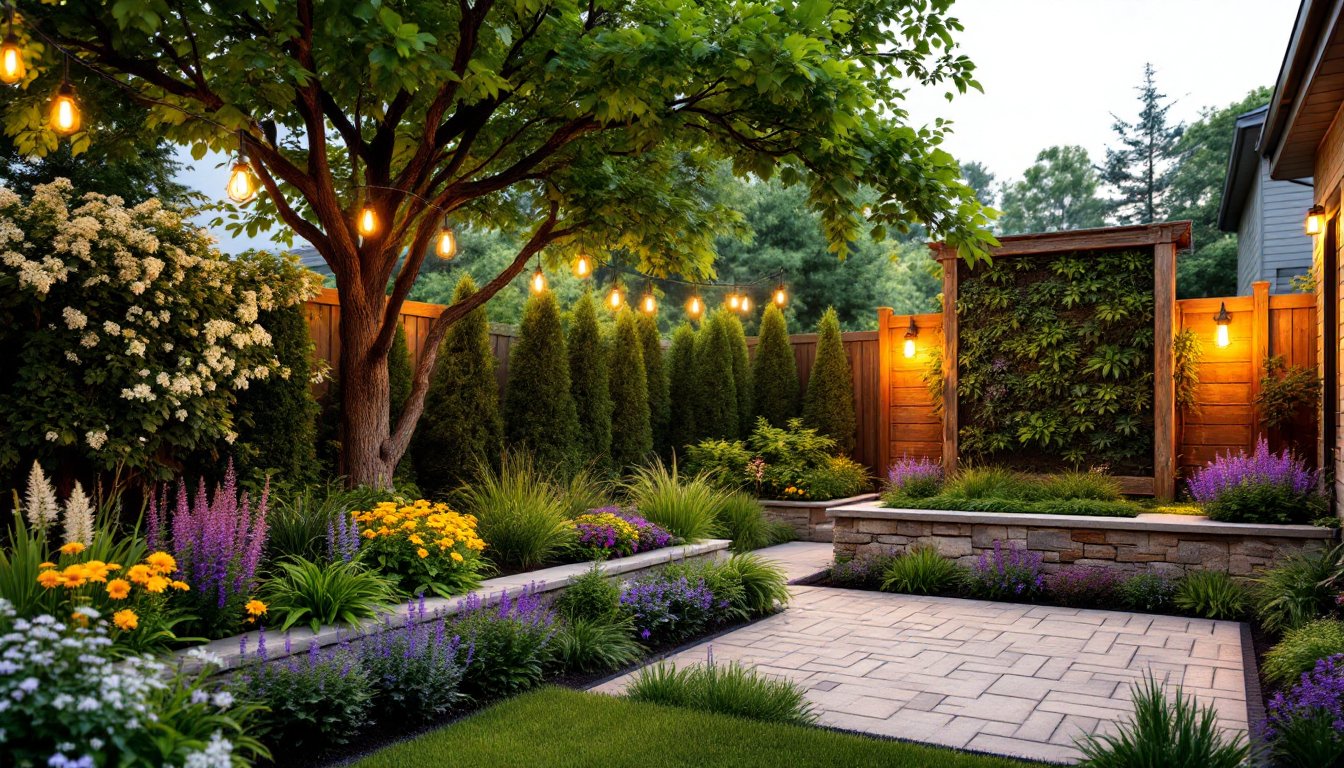
Creating Privacy Screens and Natural Borders
For privacy, the target is visual blockage at eye level, roughly 5–6 feet off the ground. Emerald Green and North Pole varieties achieve this within 3–4 years of planting.
Stagger planting rows for added depth and sound buffering. A double row with plants offset in a zigzag pattern creates a thicker visual barrier and better wind protection. Space the rows 4–5 feet apart and offset plants by half the spacing interval.
Use arborvitae to define outdoor rooms. Plant them in L-shapes or U-shapes to carve out garden beds, patios, or play areas. This approach gives structure to large, featureless yards and creates microclimates that shelter less hardy plants.
Pair arborvitae with deciduous shrubs or perennials at their base to add seasonal color. Many garden design ideas incorporate layered plantings that balance evergreen structure with flowering interest.
Planting Arborvitae: Step-by-Step Installation Guide
Best planting time: Early spring or early fall, when temperatures are moderate and rainfall is regular. Avoid planting during summer heat or frozen ground.
Tools and materials:
- Round-point shovel or spade
- Garden rake
- Measuring tape
- Work gloves and safety glasses
- Wheelbarrow
- Compost or aged manure (optional)
- Mulch (shredded bark or wood chips)
- Garden hose with spray nozzle
Step-by-step process:
-
Measure and mark planting spots. Use stakes and string to ensure a straight line. Measure on-center spacing (from the center of one root ball to the center of the next).
-
Dig holes twice as wide as the root ball but no deeper than the root ball height. Arborvitae should sit at the same depth they were growing in the nursery container. Planting too deep suffocates roots and causes decline.
-
Loosen the root ball gently if roots are circling the container. Score the sides with a utility knife if roots are tightly bound. This encourages outward growth.
-
Backfill with native soil. Don’t amend the hole with compost unless your soil is extremely poor. Arborvitae adapt better when roots grow into native soil rather than a rich pocket that discourages outward spread.
-
Water deeply immediately after planting. Soak the root zone until water pools slightly. This settles soil and eliminates air pockets.
-
Apply 2–3 inches of mulch around the base, keeping it 2–3 inches away from the trunk. Mulch piled against bark invites rot and pest issues.
-
Stake only if necessary. Arborvitae grown in containers typically don’t need staking unless the site is windy or the plant is top-heavy. Remove stakes after one growing season.
Water newly planted arborvitae 1–2 times per week for the first growing season, adjusting for rainfall. Established plants are drought-tolerant but perform best with consistent moisture.
Caring for Your Arborvitae Throughout the Seasons
Spring: Inspect for winter damage, broken branches, browning foliage, or animal damage. Prune out dead wood using bypass pruners or a pole saw for high branches. Apply a slow-release granular fertilizer formulated for evergreens, following label rates (typically 1–2 pounds per 100 square feet). Water if rainfall is less than 1 inch per week.
Summer: Maintain mulch layer to conserve moisture. Water deeply during dry spells, especially for trees planted within the last two years. Watch for bagworms, a common arborvitae pest that appears as small, hanging cone-shaped sacs. Hand-pick and destroy bags before larvae hatch.
Fall: Reduce watering as temperatures drop, but continue until the ground freezes. Arborvitae need hydrated roots going into winter. Avoid fertilizing after late summer, new growth won’t harden off before frost. Homeowners seeking additional gardening guides often find fall the best time to plan next season’s projects.
Winter: Protect young or exposed arborvitae from heavy snow and ice by gently brushing off accumulation. For plants near driveways, shield them from salt spray with burlap screens. Don’t use wire or rope to bind branches tightly, this traps moisture and causes interior browning.
Pruning: Arborvitae tolerate shearing but look best with minimal intervention. If shaping is necessary, prune in late spring after new growth hardens. Never remove more than one-third of the foliage in a single season. Cutting into bare wood (beyond the green foliage) won’t regenerate, leaving permanent gaps.
Design Ideas to Enhance Your Arborvitae Landscaping
Frame entryways with matched pairs. Flank a front door, gate, or driveway entrance with two arborvitae of the same variety and size. This creates symmetry and draws the eye toward the focal point.
Build a living fence. Replace or supplement wood or vinyl fencing with an arborvitae hedge. The initial cost is higher, but there’s no painting, staining, or board replacement over time. The hedge appreciates in value as it matures.
Create a windbreak. Plant a staggered double row of Green Giant arborvitae on the windward side of the property to reduce heating costs and protect gardens. Position the windbreak 50–100 feet from the house for maximum benefit.
Layer with seasonal color. Underplant arborvitae with shade-tolerant perennials like hostas, ferns, or astilbe. The evergreen backdrop highlights flowering plants and provides structure when perennials die back in winter.
Use as specimen plants. Set a single arborvitae in a prominent location, corner of a garden bed, beside a pond, or at the end of a pathway. Choose a variety with distinctive color or form, like ‘Zebrina’ (variegated foliage) or ‘Degroot’s Spire’ (narrow spiral shape).
Incorporate into mixed borders. Combine arborvitae with deciduous shrubs, ornamental grasses, and flowering perennials for textural contrast. The vertical evergreen form balances rounded or sprawling plants.
Edge patios and decks. Plant arborvitae in a row along the backside of a patio to create a green wall that defines the space and blocks views from neighboring properties. For outdoor entertaining ideas, this approach adds privacy without the bulk of a pergola or fence.
Measure existing hardscape features before planting. Arborvitae roots can lift pavers or crack concrete if planted too close. Maintain a 4–5 foot buffer from permanent structures.